


Back in 2022, I wrote a post called “Running a Kubernetes Cluster Using Proxmox and Rancher.” To date, it is the most viewed post on my entire substack. I realized that some of the content in that article was out of date and not as streamlined as it should be. Thus, I am writing yet another rancher guide (.yarg file?).
This guide will be slightly different in the sense that I will focus more on what you should do after the cluster is provisioned and not necessarily on the actual provisioning.
Let’s get started!
Step 1: Get a cluster going.
In my case, I am running Harvester v1.1.2 on my home server. Before doing anything, you need to create the Rancher controller VM or the frontend VM.
You need to create an Ubuntu 22.04 server on <your virtualization platform>:
I am using Harvester to spin up a VM. I am using the “ubuntu-22.04-server-cloudimg-amd64.img” with the following cloud config template:
#cloud-config
users:
- name: some-name
  sudo: ALL=(ALL) NOPASSWD:ALL
  passwd: some-password
  ssh_authorized_keys:
    - ssh-rsa...
  lock_passwd: false
  shell: /bin/bash

packages:
- curl
- wget
- btop

write_files:
- path: /tmp/install_docker.sh
  content: |
    #!/bin/bash
    curl -fsSL https://get.docker.com -o get-docker.sh
    sh get-docker.sh
    permissions: '0755'

runcmd:
- sudo apt update && sudo apt upgrade -y
- sudo /tmp/install_docker.sh
- - systemctl
  - enable
  - '--now'
  - qemu-guest-agent
Notice that curl, wget, btop, and docker automagically get installed on first boot.
When the server comes back up, we can docker ps to make sure docker is running. If yes → lesgo. If no → re-run the installer using this command:
curl -fsSL https://get.docker.com -o get-docker.sh
sh get-docker.sh
Docker will install and we will be good to go.
Now let’s run the rancher install command:
sudo docker run -d --restart=unless-stopped -p 80:80 -p 443:443 --privileged rancher/rancherWatch it pull the image, and check those logs to make sure its starting up alright:
sudo docker logs -f <container-id>After the docker container is running, wait 1-2 minutes before hitting the dashboard. The dashboard can be hit at:
https://<ip-of-rancher-server>Splendid! We are now at the dashboard and it is asking us to get the bootstrap password.
We now have a rancher controller server.
Step 2: Pick a Provider/Driver
Now that we are in the rancher dashboard, we want to navigate to the “Cluster Management” page:

We will click “Create” and we are greeted with the following:

We need to pick either a provider (top row) or we need to pick a driver. But what’s the difference?
If we want to use the full AWS EKS stack for example, we would choose the Amazon EKS Provider. Think of providers as managed Kubernetes engines.
If we want to use RKE as our engine, but we want to provision nodes on EC2 for example, we would choose the EC2 driver.
In my personal use case, since I am running this on top of Harvester, I want to use the Harvester driver.
Step 3: Configuring the Harvester Cluster
I first create a “Machine Pool” for my kube master nodes:
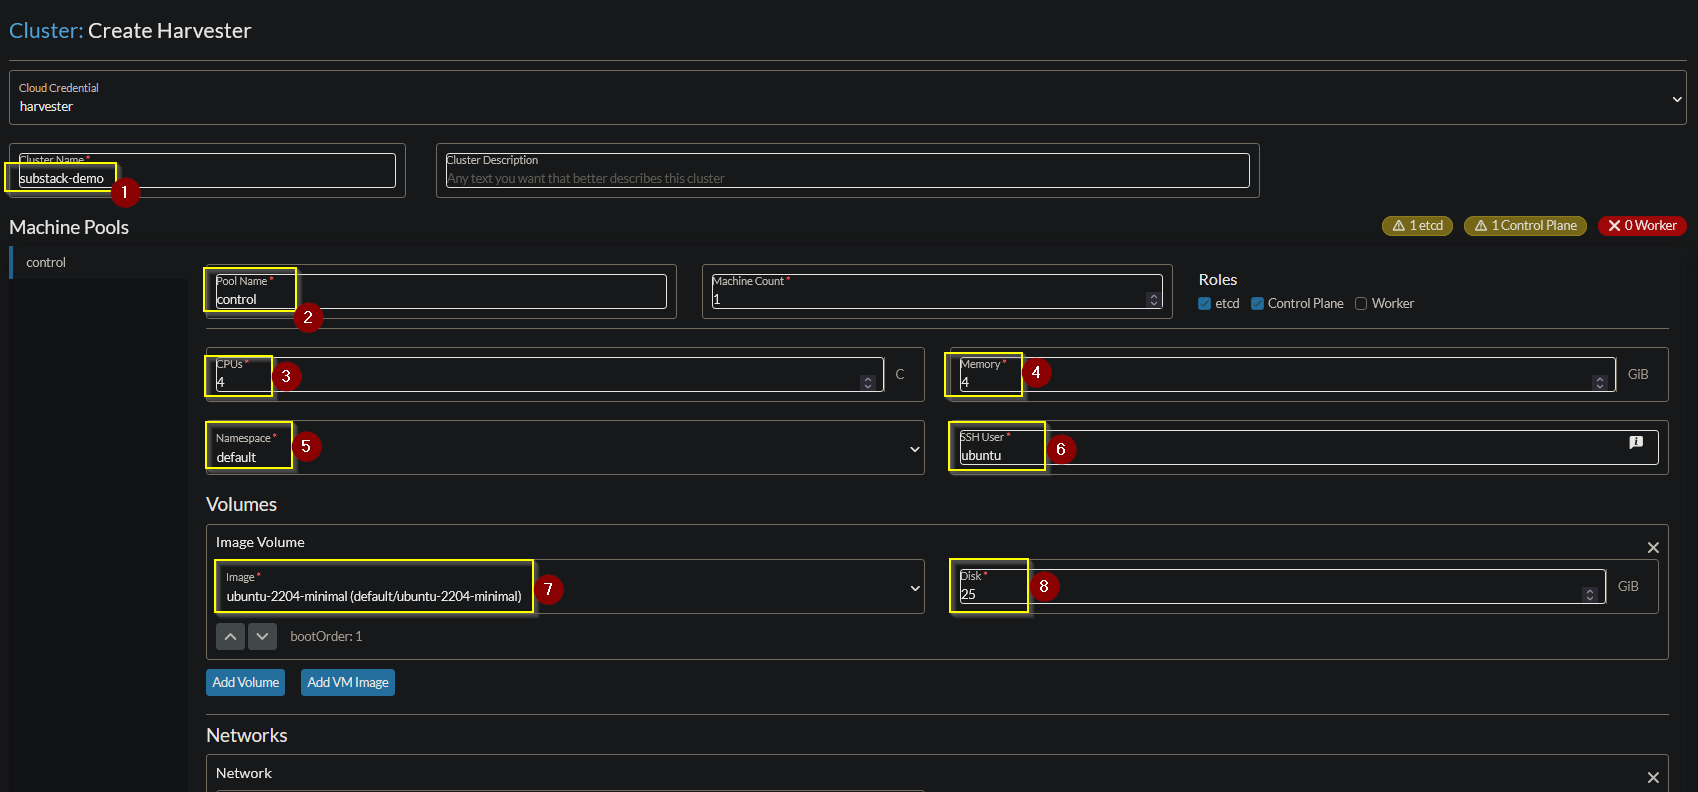
Set a cluster name
Set a pool name
Set the amount of CPUs
Set the amount of RAM
Set the namespace
Set the user
Set the image
Set the disk size
I next create a machine pool for the worker nodes:
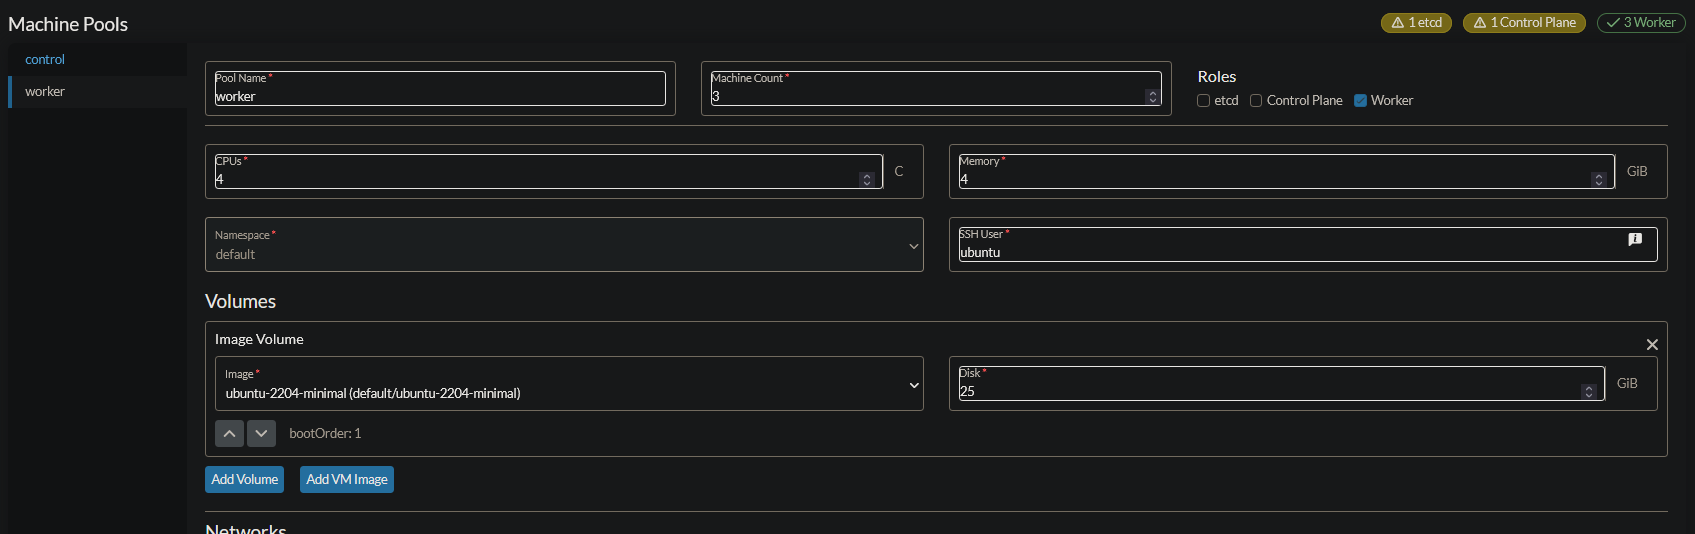
Pretty much the same as the master pool.
And finally, we click “Create.” In this use case, the cluster should be up within 10-15 minutes.
Step 4: Apply the Needed Underlying Tools
I always install the following tools:
longhorn
metallb
traefik
cert-manager
argocd
Longhorn is easy since we can install it from the “apps” section in Rancher.
Let’s install metallb:
kubectl apply -f https://raw.githubusercontent.com/metallb/metallb/v0.13.9/config/manifests/metallb-native.yamlApply the following:
apiVersion: metallb.io/v1beta1
kind: IPAddressPool
metadata:
  name: first-pool
  namespace: metallb-system
spec:
  addresses:
  - <start-ip>-<end-ip>
---
apiVersion: metallb.io/v1beta1
kind: L2Advertisement
metadata:
  name: advertisement
  namespace: metallb-system
Now we install traefik:
helm repo add traefik https://helm.traefik.io/traefik
helm repo update
kubectl create namespace traefik
helm install --namespace=traefik traefik traefik/traefik --values=traefik-values.yaml
The traefik-values.yaml file looks like this:
globalArguments:
  - '--global.checknewversion=false'
  - '--global.sendanonymoususage=false'

additionalArguments:
  - '--serversTransport.insecureSkipVerify=true'
  - '--log.level=INFO'

deployment:
  enabled: true
  replicas: 1
  annotations: {}
  podAnnotations: {}
  additionalContainers: []
  initContainers: []

ports:
  web:
    redirectTo: websecure
  websecure:
    tls:
      enabled: true

ingressRoute:
  dashboard:
    enabled: true

providers:
  kubernetesCRD:
    enabled: true
    ingressClass: traefik-external
  kubernetesIngress:
    enabled: true
    publishedService:
      enabled: false

service:
  enabled: true
  type: LoadBalancer
  annotations: {}
  labels: {}
  spec:
    loadBalancerIP: <first-ip>
  loadBalancerSourceRanges: []
  externalIPs: []
Now we apply some traefik middleware:
apiVersion: traefik.containo.us/v1alpha1
kind: Middleware
metadata:
  name: default-headers
  namespace: default
spec:
  headers:
    browserXssFilter: true
    contentTypeNosniff: true
    forceSTSHeader: true
    stsIncludeSubdomains: true
    stsPreload: true
    stsSeconds: 15552000
    customFrameOptionsValue: SAMEORIGIN
    customRequestHeaders:
      X-Forwarded-Proto: https
apiVersion: traefik.containo.us/v1alpha1
kind: Middleware
metadata:
name: traefik-dashboard-basicauth
namespace: traefik
spec:
basicAuth:
secret: traefik-dashboard-authapiVersion: v1
kind: Secret
metadata:
name: traefik-dashboard-auth
namespace: traefik
type: Opaque
data:
users: <base64 encoded user>Now we install cert-manager:
helm repo add jetstack https://charts.jetstack.io
helm repo update
kubectl create namespace cert-manager
kubectl apply -f https://github.com/cert-manager/cert-manager/releases/download/v1.9.1/cert-manager.crds.yaml
helm install cert-manager jetstack/cert-manager --namespace cert-manager --values=cert-values.yaml --version v1.9.1
The cert-values.yaml file looks like this:
installCRDs: false
replicaCount: 3
extraArgs:
  - --dns01-recursive-nameservers=1.1.1.1:53,9.9.9.9:53
  - --dns01-recursive-nameservers-only
podDnsPolicy: None
podDnsConfig:
  nameservers:
    - "1.1.1.1"
    - "9.9.9.9"
We apply the following manifest:
apiVersion: v1
kind: Secret
metadata:
  name: cloudflare-token-secret
  namespace: cert-manager
type: Opaque
stringData:
  cloudflare-token: <your-token>
And now we can apply our issuers and certificates:
apiVersion: cert-manager.io/v1
kind: ClusterIssuer
metadata:
  name: letsencrypt-production
spec:
  acme:
    server: https://acme-v02.api.letsencrypt.org/directory
    email: <your email>
    privateKeySecretRef:
      name: letsencrypt-production
    solvers:
      - dns01:
          cloudflare:
            email: <your email>
            apiTokenSecretRef:
              name: cloudflare-token-secret
              key: cloudflare-token
        selector:
          dnsZones:
            - "<your domain>"
apiVersion: cert-manager.io/v1
kind: Certificate
metadata:
name: localproduction
namespace: default
spec:
secretName: localproduction-tls
issuerRef:
name: letsencrypt-production
kind: ClusterIssuer
commonName: "*.local.<your domain>"
dnsNames:
- "local.<your domain>"
- "*.local.<your domain>"Awesome. Watch the certs get approved and we can move on.
Lastly, we install Argo CD:
kubectl create namespace argocd
kubectl apply -n argocd -f https://raw.githubusercontent.com/argoproj/argo-cd/stable/manifests/install.yaml
kubectl patch svc argocd-server -n argocd -p '{"spec": {"type": "LoadBalancer"}}'
We need to grab the default secret:
kubectl -n argocd get secret argocd-initial-admin-secret -o jsonpath="{.data.password}" | base64 -d; echoAnd that’s it. Argo CD will be available at the IP assigned by metallb.
Step 5: But what did we actually just do?
First off, we installed longhorn. Longhorn is a kubernetes block storage solution. The folks over at Rancher were pivotal in its creation and adoption. I really like the product and it works well with Rancher.
Next we installed metallb. Metallb let’s us create loadbalancers using IP blocks. In my homelab, I allocate local private IPV4 addresses to loadbalancer services in kubernetes with metallb.
Traefik is a reverse proxy. You can read my article about it here.
Cert-manager allows us to deploy local wildcard SSL certs to our hosted homelab services.
Argo CD is what I use for GitOps. Instead of applying manifests for pods manually, I use Argo CD (I should install Argo CD first and apply everything else using it but…).
And that’s about it. We now deploy our apps to kubernetes using Argo CD, and we create traefik ingressroutes that take advantage of our local ssl certs.
Cheers,
Joe