


How to Install Harvester Using PXE Boot
A Step-by-Step Guide to Installing Harvester Using PXE Boot


DISCLAIMER: This guide provides a complete tutorial of setting up a PXE server and booting machines to install Harvester remotely. If you don’t like tutorials, skip this article.
Now that we have that out of the way, let’s get started.
As you all know by now, I run Harvester on my two homelab servers. I installed Harvester using a USB drive. You can read my full guide on that here. For most of you, physical access to the install target is not a problem.
But what if you don’t have physical access to the server? What if you don’t have a USB drive? What if you don’t want to walk down a flight of stairs to get to your server?
This is where installing Harvester over PXE boot comes in.
There are s few benefits of PXE installation:
Allows installing Harvester on multiple machines over the network without physical access.
Very convenient for deploying clusters at scale.
After initial setup, new nodes can be added to the cluster easily.
Personally, I am shifting more and more to an IAC model. If I can define my infra as code, I will. Call me extra.
So what are all the moving parts here?
PXE-enabled server to host DHCP, TFTP, and HTTP services
ISO, kernel, initrd, and rootfs images for Harvester
Target machines with PXE boot capability
Let’s create the HTTP server. The role of this server is simple:
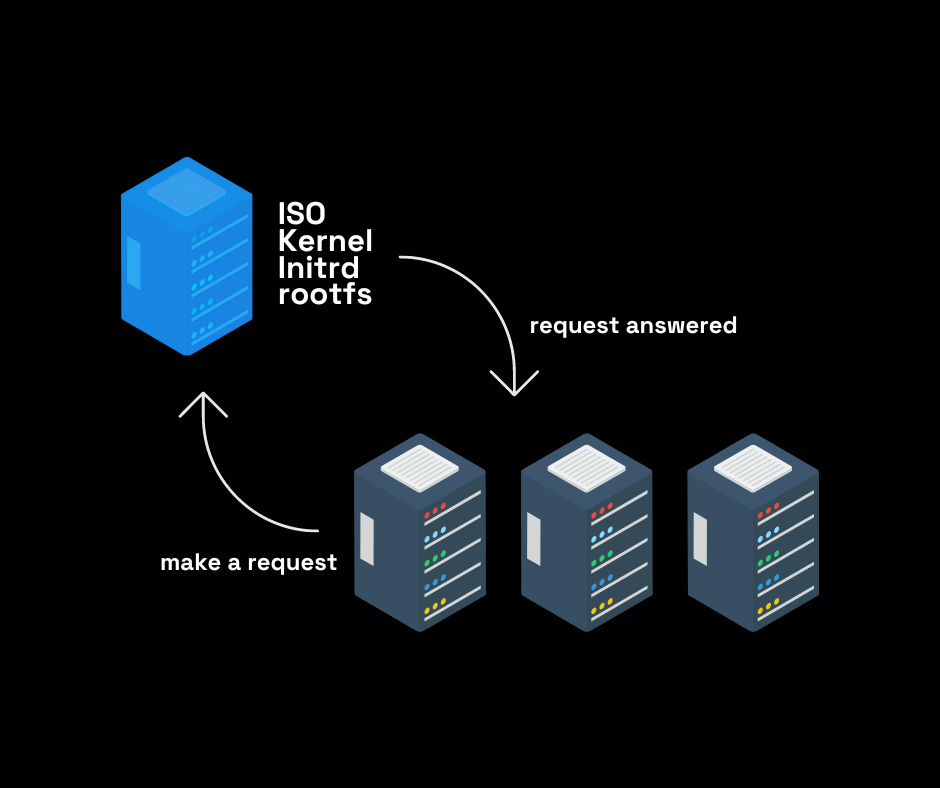
The ISO file with the OS, kernel, initrd, and rootfs are stored on the HTTP server. A config file tells our harvester nodes to ask the HTTP server for the files that are stored there. The HTTP server obliges and the files are downloaded to the nodes.
Personally I use Apache to host my files. Here is a simple script that creates an Apache web server.
#!/bin/bash

# Update package list and install apache2
sudo apt-get update && sudo apt-get upgrade -y
sudo apt-get install -y apache2

# Enable required Apache modules
sudo a2enmod proxy
sudo a2enmod proxy_http

# Create a directory to store ISO files
sudo mkdir -p /var/www/html/iso

# Set permissions for the ISO directory
sudo chown -R www-data:www-data /var/www/html/iso
sudo chmod -R 755 /var/www/html/iso

# Create a virtual host configuration for serving ISO files
sudo bash -c "cat > /etc/apache2/sites-available/iso.conf << EOL
<VirtualHost *:80>
    ServerAdmin webmaster@localhost
    DocumentRoot /var/www/html/iso

    ErrorLog \${APACHE_LOG_DIR}/iso-error.log
    CustomLog \${APACHE_LOG_DIR}/iso-access.log combined

    ProxyPreserveHost On
    ProxyPass / http://127.0.0.1:80/
    ProxyPassReverse / http://127.0.0.1:80/
</VirtualHost>
EOL
"

# Enable the ISO virtual host and restart Apache
sudo a2ensite iso
sudo systemctl restart apache2

# Print the message
echo "Apache is now serving ISO files from /var/www/html/iso"

#Download the ISO files
sudo wget -P /var/www/html/iso https://releases.rancher.com/harvester/v1.1.2/harvester-v1.1.2-amd64.iso
sudo wget -P /var/www/html/iso https://releases.rancher.com/harvester/v1.1.2/harvester-v1.1.2-initrd-amd64
sudo wget -P /var/www/html/iso https://releases.rancher.com/harvester/v1.1.2/harvester-v1.1.2-vmlinuz-amd64
sudo wget -P /var/www/html/iso https://releases.rancher.com/harvester/v1.1.2/harvester-v1.1.2-rootfs-amd64.squashfs

#Print the message
echo "ISO files downloaded to /var/www/html/iso"
Notice that the Harvester files for v1.1.2 are downloaded and served at http://<IP>/iso.
There are two more files that we need to define and serve via HTTP.
The first file is a “create” cluster file. This file is used by the first node and creates the initial cluster. The second file is a “join” cluster file. This file joins any other node to the existing cluster. SUSE gives us some examples in their docs.
Here is the create file:
# config-create.yaml
scheme_version: 1
token: token # Replace with a desired token
os:
  hostname: <node-name> # Set a hostname. This can be omitted if DHCP server offers hostnames
  ssh_authorized_keys:
  - ssh-rsa ... # Replace with your public key
  password: <your password>     # Replace with your password
  ntp_servers:
  - 0.suse.pool.ntp.org
  - 1.suse.pool.ntp.org
install:
  mode: create
  management_interface: # available as of v1.1.0
    interfaces:
      - name: ens5
    default_route: true
    method: dhcp
    bond_options:
      mode: balance-tlb
      miimon: 100
  device: /dev/sda # The target disk to install
#  data_disk: /dev/sdb # It is recommended to use a separate disk to store VM data
  iso_url: http://<apache-server-ip>/iso/harvester-v1.1.2-amd64.iso
#  tty: ttyS1,115200n8   # For machines without a VGA console

  vip: <a ip address on your subnet>        # The VIP to access the Harvester GUI. Make sure the IP is free to use
  vip_mode: static
#  vip_mode: dhcp       # Or static, check configuration file for more information
#  vip_hw_addr: 52:54:00:ec:0e:0b   # Leave empty when vip_mode is static
Here is the join file:
# config-join.yaml
scheme_version: 1
server_url: https://<vip ip address>:443  # Should be the VIP set up in "CREATE" config
token: token
os:
  hostname: <node-name>
  ssh_authorized_keys:
    - ssh-rsa ... # Replace with your public key
  password: <your-password>     # Replace with your password
  dns_nameservers:
  - 1.1.1.1
  - 8.8.8.8
install:
  mode: join
  management_interface: # available as of v1.1.0
    interfaces:
      - name: ens5
    default_route: true
    method: dhcp
    bond_options:
      mode: balance-tlb
      miimon: 100
  device: /dev/sda # The target disk to install
#  data_disk: /dev/sdb # It is recommended to use a separate disk to store VM data
  iso_url: http://<apache-server-ip>/iso/harvester-v1.1.2-amd64.iso
#  tty: ttyS1,115200n8   # For machines without a VGA console
Now that we are serving the files, how do we call them?
Calling the file will vary based on your network. In OCI for example, you can pass the IPXE file and boot will progress. On your home network, you will have to define your HTTP server as a network boot. Either way, we will need a create ipxe boot file and a join file.
That create file will look like this:
#!ipxe
kernel harvester-v1.1.2-vmlinuz ip=dhcp net.ifnames=1 rd.cos.disable rd.noverifyssl console=tty1 root=live:http://<apache-server-ip>/iso/rootfs.squashfs harvester.install.automatic=true harvester.install.config_url=http://<apache-server-ip>/iso/config-create.yaml
initrd harvester-v1.1.2-initrd
boot
Notice we are calling the “config-create.yaml” file.
The join fille will look like this:
#!ipxe
kernel harvester-v1.1.2-vmlinuz ip=dhcp net.ifnames=1 rd.cos.disable rd.noverifyssl console=tty1 root=live:http://<apache-server-ip>/iso/rootfs.squashfs harvester.install.automatic=true harvester.install.config_url=http://<apache-server-ip>/iso/config-join.yaml
initrd harvester-v1.1.2-initrd
boot
Almost exactly the same except now we are calling the “config-join.yaml” file.
Keep in mind, you can configure various Harvester settings during install by defining them in the “config-create.yaml” file. Check out the Harvester docs for more info.
Hopefully this was helpful to some of my readers. Keep in mind this is a very basic setup that I have defined. You will need to tweak the files based on your specific use case.
Cheers,
Joe