Installing AdGuard Home on Oracle Cloud for FREE
A full tutorial on how to install AdGuard Home on Oracle Cloud
As I mentioned in my previous post, I am done with Pi-Hole. I am also reluctantly shifting away from NextDNS for the time being. That leaves me with a major decision…
How do I fill the void that has been created? What free and open source, powerful network-wide ads & trackers blocking DNS server can I use?
*AdGuard Home enters the chat.
AdGuard Home caught my eye a while back and the project has seemed to mature more and more over the last year or so. Recently, I wrote an article about running AdGuard Home on Kubernetes (I promise that’s the last link to previous posts lol). The only problem is that I wanted to run AdGuard Home (here on out AGH) outside of my home network. I only have one server at the moment running Harvester. If my server goes down, my Kubernetes cluster goes down. If my Kubernetes cluster goes down, my DNS would go down. Since I have my Kubernetes API endpoint as a DNS rewrite (<IP address of control node> → https://rancher.mcglock), my Kubernetes cluster would not be able to spin up.
So, I did the next best thing. If I can’t run it on my own home server. Why not run it on Oracle Cloud for free. I have mentioned the great Ampere shape promotion many times. I will not be going into that here but basically, I can run a A1 Flex shape VM with 2 CPU cores and 12 GB of RAM for free on OCI.
In this tutorial, I will show you how to do that as well.
Step 1: Set up the OCI Instance
We first need to create the OCI instance that will run AGH.
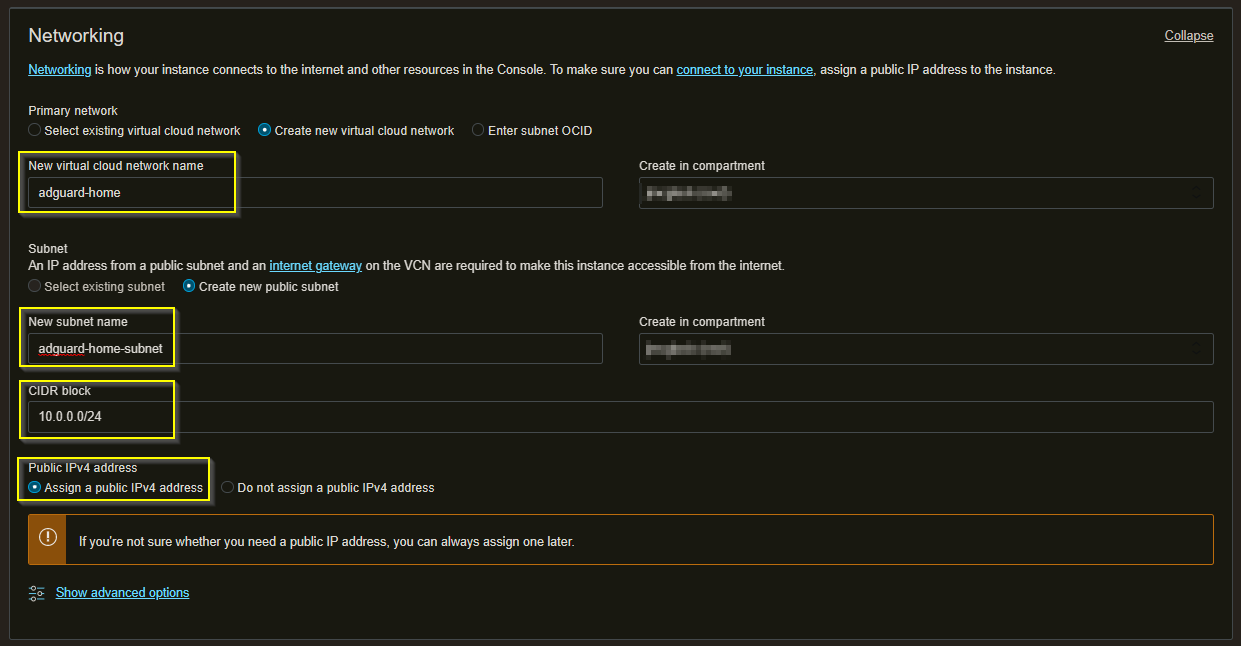
Next, we need to create a new VCN.
Next, add your SSH key.
And voila! The instance is created!
Step 2: Edit the VCN Security List
Next, we need to edit the default security list of our VCN.
Navigate to your new VCN and click on the public subnet we created.
Let’s break down what we are doing here:
We need port 22 for SSH
We need port 53 TCP and 53 UDP for DNS
We need port 3000 for the initial set up screen (we can delete this entry after set up)
We need port 80 for the web gui
When you use your public IP address as the source, you are telling OCI to drop all incoming connections unless they are from your home network.
Step 3: Set Up the Server
Now it’s time to set up the server itself.
SSH into your instance. The default username is “ubuntu” and there is no passwd set. You will need to use the SSH key you provided earlier.
Once we are in, we need to update:
sudo apt update && sudo apt upgrade -yAfter all the updates are complete, we need to change some stuff in our iptables rules:
sudo nano /etc/iptables/rules.v4 Add the following lines (in italics):
:INPUT ACCEPT [0:0]
:FORWARD ACCEPT [0:0]
:OUTPUT ACCEPT [463:49013]
:InstanceServices - [0:0]
-A INPUT -m state --state RELATED,ESTABLISHED -j ACCEPT
-A INPUT -p icmp -j ACCEPT
-A INPUT -i lo -j ACCEPT
-A INPUT -p udp --sport 123 -j ACCEPT
-A INPUT -p tcp --dport 53 -j ACCEPT
-A INPUT -p udp --dport 53 -j ACCEPT
-A INPUT -p tcp -m state --state NEW -m tcp --dport 80 -j ACCEPT
-A INPUT -p tcp -m state --state NEW -m tcp --dport 3000 -j ACCEPT
-A INPUT -p tcp -m state --state NEW -m tcp --dport 22 -j ACCEPT
-A INPUT -j REJECT --reject-with icmp-host-prohibited
-A FORWARD -j REJECT --reject-with icmp-host-prohibited
-A OUTPUT -d 169.254.0.0/16 -j InstanceServices
And now we reboot:
sudo rebootAfter the server comes back up we will SSH back in and start the installer:
curl -s -S -L https://raw.githubusercontent.com/AdguardTeam/AdGuardHome/master/scripts/install.sh | sh -s -- -vAnd we should get a success that looks like this:
Awesome! Now, lets jump to http://<public-ip>:3000
If all went well, we should see the following screen:
Amazing.
Ubuntu users, you will see the following error on the second page of the wizard:
validating ports: listen tcp 0.0.0.0:53: bind: address already in useThe fix is simple:
sudo mkdir -p /etc/systemd/resolved.conf.d
sudo nano /etc/systemd/resolved.conf.d/adguardhome.conf
And paste the following into the new “adguardhome.conf” file:
[Resolve]
DNS=127.0.0.1
DNSStubListener=no
Save the file and run the following:
sudo mv /etc/resolv.conf /etc/resolv.conf.backup
sudo ln -s /run/systemd/resolve/resolv.conf /etc/resolv.conf
sudo systemctl reload-or-restart systemd-resolved
Reload the wizard page and you should no longer see the error. Now finish the wizard.
Step 4: The Setting I Change
Here are some setting I always change after a fresh install.
Setting → General Settings
Query logs rotation (24 hours)
Statistics retention (24 hours)
Settings → DNS Settings
Upstream DNS Server 9.9.9.11
Bootstrap DNS Server 9.9.11
Private Reverse DNS Server 9.9.9.11
Cache Size 400000
Optimistic Caching On
Allowed Clients <my-public-ip>/32
Filters → DNS Blocklists
https://raw.githubusercontent.com/hagezi/dns-blocklists/main/adblock/ultimate.txt
https://raw.githubusercontent.com/hagezi/dns-blocklists/main/adblock/tif.txt
https://raw.githubusercontent.com/jmcglock/adguard-home/main/dns-blocklist.txt
Filters → DNS Allowlist
https://raw.githubusercontent.com/jmcglock/adguard-home/main/dns-allowlist.txt
Filter DNS Rewrites
All my DNS rewrites
Filters → Blocked Services (if I have never heard of it, it gets blocked)
9gag
douban
lazada
mail_ru
origin
qq
riot_games
tiktok
vimeo
wechat
weibo
vk
valorant
tinder
snapchat
rakuten_viki
mastodon
leagueoflegends
iqiyi
icloud_private_relay
crunchyroll
bilibili
dailymotion
disneyplus
imgur
kakaotalk
line
onlyfans
shopee
viber
voot
whatsapp
zhihu
Filters → Custom Filtering
hubstaff.com
atlassian.net
And that’s it.
Here’s a tip, you can back up your config file (located at /opt/AdGuardHome/AdGuardHome.yaml) and whenever you do a new server install, you can simply replace the yaml file with your backed up file.
Have fun with AGH!
Cheers,
Joe


