

Running a Kubernetes Cluster for FREE on Oracle Cloud
Part 1: Set Up the Cluster


Warning: this is a long tutorial.
So, here’s the thing. I love Oracle Cloud. Don’t get me wrong, I love all clouds. But I do not love all clouds equally. Oracle just seems to place the majority of their focus on their core services: compute, storage, networking, databases, and security. I love when a company decides to specialize in a few things and do those things REALLY WELL instead of trying to specialize in everything and doing everything kind of good. Anyway, if you haven’t read my review of OCI make sure to read it here.
I also love Kubernetes. I mean who doesn’t. For you musical nerds out there, Kubernetes is like a symphony conductor, bringing all the musicians (containers) together to perform in perfect harmony and orchestrate a beautiful symphony (deployment), while Docker is just a single instrument (container) playing alone. For you sports junkies out there, Kubernetes is like a head coach, leading a team of players (containers) to work together and achieve their goals in a coordinated and efficient way, while Docker is just a single player on the field. And lastly for all the finance bros who follow Elon Musk and WallStreetSilver, Kubernetes is like a cryptocurrency exchange, managing a diverse set of digital assets (containers) and facilitating trades and transactions to optimize performance, while Docker is just SHIBA.
TLDR; Kubernetes on Oracle is amazing.
Let’s look at what we are NOT going to be getting for free:
A ton of resources
An AMD64 processor
Block storage
High throughput load balancer
A production grade cluster
That last one can be a deal breaker for some. Why would I want to bother if this cluster will not be production grade? Let’s answer this be explaining what a production grade cluster looks like.
Master nodes: These are the control plane nodes that manage the state of the cluster and make decisions about how to allocate resources. The master nodes typically run the Kubernetes API server, etcd (a distributed key-value store), and other control plane components.
Worker nodes: These are the nodes where workloads are actually run. They run the Kubernetes kubelet and kube-proxy components, as well as container runtime (such as Docker) to execute the pods.
etcd nodes: These are used to store the configuration data of the cluster, such as the state of the objects in the cluster.
Load Balancer: It distributes the traffic between the master nodes.
Networking: A production-grade Kubernetes cluster also requires a robust and reliable networking infrastructure to ensure that pods and services can communicate with each other and with the outside world.
Monitoring and Logging: Kubernetes cluster must have monitoring and logging infrastructure to collect and analyze logs and metrics. This can include tools like Prometheus, Grafana, and Elasticsearch.
Storage: A production-grade Kubernetes cluster will also require a storage solution for data persistence, such as a distributed file system like GlusterFS or Ceph, or a cloud-based storage service like AWS EBS or GCP Persistent Disk.
Authentication and Authorization: Security is a critical aspect of a production-grade Kubernetes cluster, thus it should include mechanisms for authenticating and authorizing users and services, such as integration with LDAP or Active Directory, or using a service like Keycloak or Auth0.
NEWSFLASH: Our cluster will contain all of these elements; however, I can’t recommend that you use this cluster in production for one reason: ARM64.
As I discussed in an earlier article (which you can read here), I stumbled across an amazing promotion that allows cloud users up to “the first 3,000 OCPU hours and 18,000 GB hours per month or the equivalent to 4 OCPUs and 24 GB of memory” of the VM.Standard.A1.Flex compute shape. That A1.Flex compute shape is an ARM based CPU.
If you don’t know if your application is compatible with ARM, it probably isn’t. I had to build my docker images a certain way to be compatible with ARM. I will go over how to do this in a later article. For now, if you don’t think your application is compatible with ARM, double check.
NOW, FINALLY! Let’s see what we are actually getting for free.

We have 4 instances, each with 1 ARM CPU (A1 Shape), 6GB of RAM, and 50GB boot volume (you get up to 200GB for free). Notice that I also have a master node on this list. Since it is offered free of charge by Oracle when a OKE cluster is spun up, we won’t actually see or be able to control this instance.
We also have two flexible shape load balancers. They are capped at 10MBps which is totally enough for small applications to be served up.
And lastly, we have one VCN (Virtual Cloud Network) that has 4 subnets. One is a private (or public) subnet for your worker nodes, the second is a private (or public) subnet for your services, the third is a public subnet for your API, and the fourth is a public subnet for your rancher instance.
And all this for free.
I would like to point out that the rancher instance is not necessary at all. I just like to manage my cluster from Rancher and not just from the command line.
So now that we are clear on what we are getting. I would like to set the bar. 3CPUs and 18GB of RAM is not a ton of resources for a cluster. If you have a high intensity application with a lot of microservices, this probably won’t be enough. You can scale up, but that will cost money.
How do we get started?
Easy.
Sign up for an OCI account if you don't have one already.
In the OCI hamburger menu, navigate to the "Developer Services → Kubernetes Cluster (OKE)"

and click on the “Create Cluster” button once you get to the page.
Choose the “Quick Create” option:

Notice that this will create a VCN, IG, SGW, and our cluster nodes. This wizard is super handy.
Fill in the required fields:
Name
Compartment
Kube version
API pub/priv
Worker pub/priv
Shape
CPUs
RAM
Number of nodes
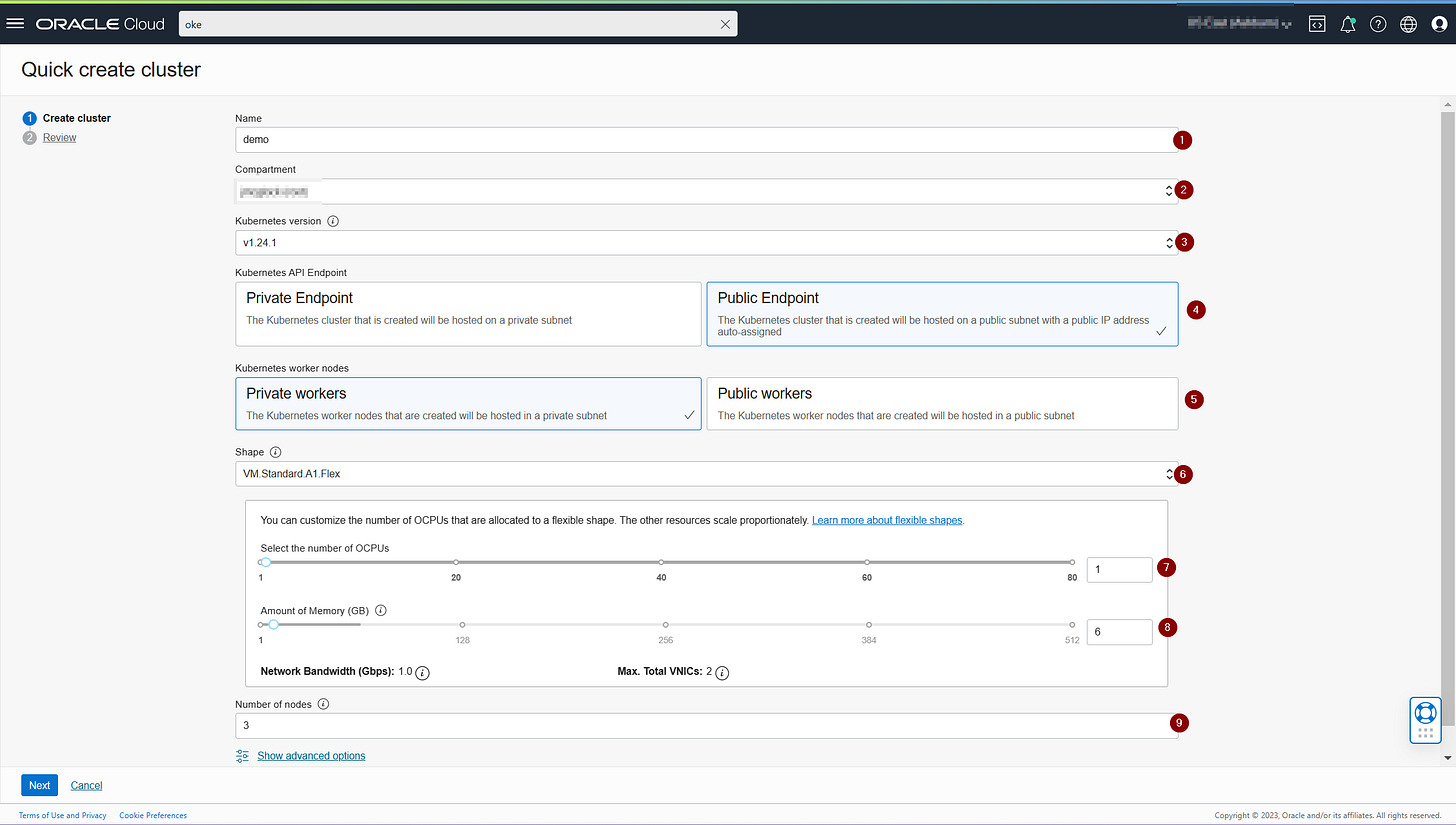
Feel free to use all the same choices as me.
Click on the "Next" button and confirm the details before finishing.
Now we wait. A rather long time. The fastest a cluster was ever provisioned in my personal experience was 10 minutes. Go grab that coffee and wait it out.
Great! Your cluster is now created and all work orders have succeeded. You should see something like this:

The red boxes are redacted info.


Great, now how do we access our cluster? It’s pretty simple actually.
Click on “Access Cluster” and choose the “Local Access” option:

Notice that in order to access the cluster locally through the command line, you will need to first download and install the OCI CLI. It’s a pretty simple process. You will also have to walk through configuring the OCI CLI which is a little more challenging. Oracle has tutorials on this.
Run the commands listed on the access cluster page. Running the commands will result in you getting the kubeconfig file to access your new cluster.

And there’s your cluster all set up.
In a future article I will show you how to set up rancher, traefik, and how to deploy your first application using argo-cd.
Cheers,
Joe